
Knitting for Beginners: How to purl + the stockinette stitch
Whenever I talk about knitting to someone who may not know much about knitting, they typically ask about the “typical looking knit stitch”. This is that nice clean “V” knit stitch also known as the stockinette stitch. There are 2 basic knit stitches when it comes to knitting. Knitting and purling.
To knit anything, you need to know how to knit and purl first.
Knitting up stockinette is a bit more work than garter as you’re both knitting and purling with stockinette stitch. In my garter stitch blog post, we learned how to knit. Now, in learning to knit stockinette, we are going to learn how to purl.
Related Blog Posts: Easy cast ons for beginners, how to knit garter stitch
Knitting Stockinette Stitch
With stockinette stitch, it matters what each side looks like. We want that clean “V” knit stitch, but in order to get that, we need to knit one row and purl the other.
If you have read my garter stitch blog post, then you already know how to knit and can skip to the purling part!
How to knit
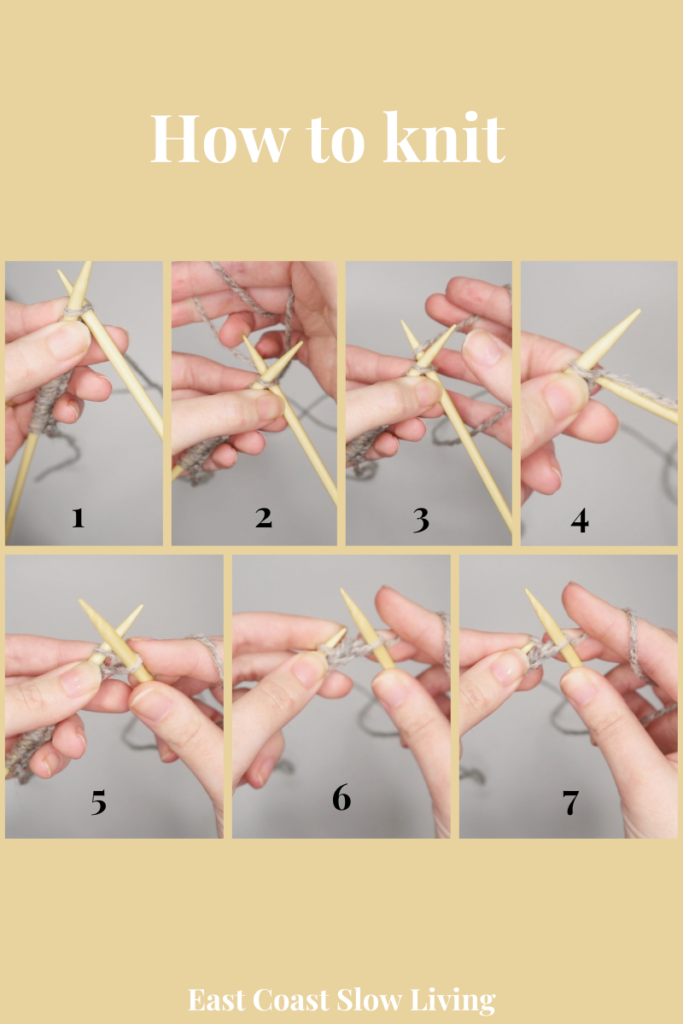
- In our left hand, we have a knitting needle that is holding our stitches. The right needle should be empty. Insert the right needle into the stitch on the left needle from behind.
- Taking the working yarn, we are going to wrap the yarn around the right needle from back to front.
- Wrap the working yarn around the right needle and pull the yarn down so it touches the stitch on the left needle.
- Now with the right needle, grab the yarn that we wrapped around the needle in the previous step. Pull down with the working yarn wrapped around the needle.
- Pull the working yarn through the stitch on the left needle. It should almost look like there is an 8 on your needles.
- Instead of slipping the stitch onto the needle as you would do for the knitted cast on, we are going to push the stitch on our left needle off the hook (slip the stitch off)
- And now we have knitted our first knit stitch onto the new working needle.
How to purl
Once you complete a row of knitting, we are going to purl the next row.
An important difference between purling and knitting is the placement of the working knitting needle. When knitting, you are inserting the needle in the back and working the yarn from the back.
With purling, you are instead inserting the working needle into the front of the stitch and keeping the working yarn in the front.
You can see these differences in the images above and below.
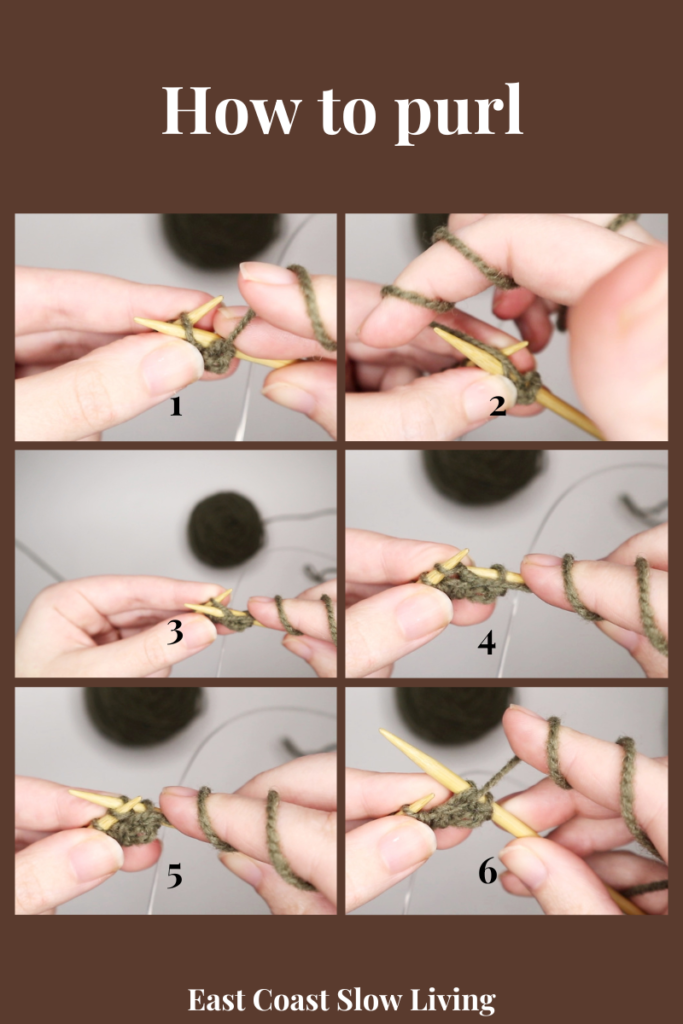
- Insert the right knitting needle into the front of the stitch on the left needle. Make sure that your working yarn is in the front.
- Taking the working yarn, we are wrapping it around the right needle, and pull down so the working yarn touches the stitch.
- Like what we did we with knitting, we are going to grab that loop that we just placed on the knitting needles with our right needle.
- Pull that loop now through the stitch.
- You should now have 2 stitches on your right needle.
- Again, like we do with knitting, we are slipping that stitch on the left needle completely off.
Time to knit stockinette
Now that you’ve completed these 2 rows, you can continue knitting and purling to achieve that beautiful V shape stitch.
With stockinette stitch, it tends to curl. Make sure you are knitting up a border around your project if you don’t want your edges to curl.
Now you know how to knit and purl which means you can knit anything! Enjoy the start of your knitting journey.
Happy knitting,
Kate